This post basically covers in detail about how to add a custom link and ADF page in OIM.
We will build an ADF project, develop a custom bounded task-flow and deploy the same in OIM. Then we will configure the link to launch our custom task-flow from within OIM which will display a simple page having an input text field and command button.
On entering some text and clicking on the button will open a dialog showing the entered text.
Simple??? Yes.. Readers can further build their own projects fitting their own requirements.
Lets see how to do it..
Note: This project is developed with Jdeveloper, make sure
to have jdeveloper with soa-jdev-extension installed.
- Create a Fusion Web Application (ADF) from your Jdeveloper.

- Name your Application and Project.
- Copy jdev.lib folder from
- <OracleHome>/<Middleware home>/Oracle_IDM1/server and adflibPlatformUI.jar from <OracleHome>/Middleware/Oracle_IDM1/server/modules/oracle.iam.ui.view_11.1.2 to the server where you have the Jdeveloper.
- Right click on the viewController, from Project Properties then Libraries and Class Path and click on Add Library.
- Click on Load Directory and select jdev.lib folder just copied in the previous step.

- Select the OIM Client Library, OIM Model Shared Library, OIM View Shared Library and click OK.

- Click on Add Jar/Directory add the adflibPlatformUI.jar.
- Right click on the viewController and create a new ADF Task Flow.

- Provide the task flow details.

- Drag and drop a view activity from the component palette in to the just created task flow definition.Name the view activity as "defaultPage".

- Double click on the view activity. Create a new JSF Page Fragment.Leave the file name that appears by default. Expand the Page Implementation and select the option “Automatically Expose UI Components in a New Managed Bean” and provide the managed bean name and class name

- As a result of the previous step, a jsff page named defaultPage.jsff and java class named MyCustomBean would be generated and a managed bean named myCustomBean would be created.
- Go to the task flow definition xml and switch to the “Overview” section. You would be able to see the managed bean just created in the previous step. You can change the scope of the bean here as per requirement. In our example we will change it to pageFlow scope and save the file.

- Switch to the defaultPage.jsff. Drag and drop the components from the Component Palette and design the page as per requirement. In our case we will keep it simple, it will have an input text field and a button. After entering value in the text field and clicking on the button a dialog box would appear showing the entered value.
- After generating the jsff page please make sure to switch to "Source" view and check if the bindings of the UI components and actionListener properties are correct. Bindings should look like this - binding="#{pageFlowScope.myCustomBean.cb1}
- The jsff page looks like this
<?xml version='1.0' encoding='UTF-8'?>
<jsp:root xmlns:jsp="http://java.sun.com/JSP/Page" version="2.1"
xmlns:af="http://xmlns.oracle.com/adf/faces/rich"
xmlns:f="http://java.sun.com/jsf/core">
<af:decorativeBox binding="#{pageFlowScope.myCustomBean.db1}" id="db1">
<f:facet name="center">
<af:panelBox text="My Panel" binding="#{pageFlowScope.myCustomBean.pb1}" id="pb1">
<f:facet name="toolbar">
<af:spacer width="10" height="10" binding="#{pageFlowScope.myCustomBean.s1}"
id="s1"/>
</f:facet>
<af:inputText label="Provide Your Input" binding="#{pageFlowScope.myCustomBean.it1}" id="it1"/>
<af:separator binding="#{pageFlowScope.myCustomBean.s2}" id="s2"/>
<af:spacer width="10" height="10" binding="#{pageFlowScope.myCustomBean.s3}" id="s3"/>
<af:commandButton text="Submit" binding="#{pageFlowScope.myCustomBean.cb1}"
id="cb1" action="#{pageFlowScope.myCustomBean.buttonAction}"/>
</af:panelBox>
</f:facet>
<f:facet name="top"/>
</af:decorativeBox>
<!--oracle-jdev-comment:auto-binding-backing-bean-name:myCustomBean-->
</jsp:root>
17. Edit the MyCustomBean.java generated as part of step 11 to implement the action listeners or the business logic as per requirement.
18. MyCustomBean.java looks like this -
package fusionOIMApp.view.backing;
import oracle.adf.view.rich.component.rich.input.RichInputText;
import oracle.adf.view.rich.component.rich.layout.RichDecorativeBox;
import oracle.adf.view.rich.component.rich.layout.RichPanelBox;
import oracle.adf.view.rich.component.rich.nav.RichCommandButton;
import oracle.adf.view.rich.component.rich.output.RichSeparator;
import oracle.adf.view.rich.component.rich.output.RichSpacer;
public class MyCustomBean {
private RichDecorativeBox db1;
private RichPanelBox pb1;
private RichInputText it1;
private RichSpacer s1;
private RichSeparator s2;
private RichSpacer s3;
private RichCommandButton cb1;
public void setDb1(RichDecorativeBox db1) {
this.db1 = db1;
}
public RichDecorativeBox getDb1() {
return db1;
}
public void setPb1(RichPanelBox pb1) {
this.pb1 = pb1;
}
public RichPanelBox getPb1() {
return pb1;
}
public void setIt1(RichInputText it1) {
this.it1 = it1;
}
public RichInputText getIt1() {
return it1;
}
public void setS1(RichSpacer s1) {
this.s1 = s1;
}
public RichSpacer getS1() {
return s1;
}
public void setS2(RichSeparator s2) {
this.s2 = s2;
}
public RichSeparator getS2() {
return s2;
}
public void setS3(RichSpacer s3) {
this.s3 = s3;
}
public RichSpacer getS3() {
return s3;
}
public void setCb1(RichCommandButton cb1) {
this.cb1 = cb1;
}
public RichCommandButton getCb1() {
return cb1;
}
public String buttonAction() {
System.out.println("Inside buttonAction");
RichInputText inputText = getIt1();
String selectedText = (String)inputText.getValue();
System.out.println("Selected: "+selectedText);
CustomFacesUtils.addInfoMessage("Hi, You Have Entered - "+selectedText);
return null;
}
}
19. The CustomFacesUtils class implements few methods to render UI components.
package fusionOIMApp.view.backing;
import java.util.Map;
import javax.faces.application.FacesMessage;
import javax.faces.context.FacesContext;
import oracle.adf.model.BindingContext;
import oracle.adf.model.binding.DCBindingContainer;
import oracle.adf.model.binding.DCControlBinding;
import oracle.iam.ui.platform.utils.TaskFlowUtils;
import oracle.jbo.uicli.binding.JUCtrlActionBinding;
import oracle.jbo.uicli.binding.JUEventBinding;
public class CustomFacesUtils {
/**
* Launch bounded taskFlow based on provided parameters.
* @param id ID
* @param taskFlowId Task Flow ID
* @param name Name
* @param icon Icon
* @param description Description
* @param helpTopicId Help Topic Id
* @param inDialog in Dialog
* @param params params
*/
public static void launchTaskFlow(String id, String taskFlowId,String name, String icon,String description, String helpTopicId,boolean inDialog, Map<String, Object> params) {
System.out.println("Inside launchTaskFlow ---------------------------------------------");
// create JSON payload for the contextual event
String jsonPayLoad =TaskFlowUtils.createContextualEventPayLoad(id, null, taskFlowId ,name, icon, description, helpTopicId, inDialog, params);
// create and enqueue contextual event
DCBindingContainer bc = (DCBindingContainer)BindingContext.getCurrent().getCurrentBindingsEntry();
DCControlBinding ctrlBinding = bc.findCtrlBinding(TaskFlowUtils.RAISE_TASK_FLOW_LAUNCH_EVENT);
// support both bindings - using eventBinding as well as methodAction
if (ctrlBinding instanceof JUEventBinding) {
JUEventBinding eventProducer = (JUEventBinding) ctrlBinding;
bc.getEventDispatcher().queueEvent(eventProducer, jsonPayLoad);
} else if (ctrlBinding instanceof JUCtrlActionBinding) {
JUCtrlActionBinding actionBinding = (JUCtrlActionBinding) ctrlBinding;
bc.getEventDispatcher().queueEvent(actionBinding.getEventProducer(), jsonPayLoad);
} else {
throw new IllegalArgumentException("Incorrect binding for " + TaskFlowUtils.RAISE_TASK_FLOW_LAUNCH_EVENT);
}
System.out.println("End of launchTaskFlow ---------------------------------------------");
bc.getEventDispatcher().processContextualEvents();
}
/**
* Purpose of this method is to render the Information messages
* @param message Information Message
*/
public static void addInfoMessage(String message) {
if(FacesContext.getCurrentInstance() != null) {
FacesContext.getCurrentInstance().addMessage("", new FacesMessage(FacesMessage.SEVERITY_INFO, message, message));
}
}
/**
* Purpose of this method is to render the Error messages
* @param message Error messages
*/
public static void addErrorMessage(String message) {
if(FacesContext.getCurrentInstance() != null) {
FacesContext.getCurrentInstance().addMessage("", new FacesMessage(FacesMessage.SEVERITY_ERROR, message, message));
}
}
}
20. Write a java class which will have actionListener method to be invoked on clicking of the link to be added in OIM. In our example it is Redirect.java which looks like this -
package fusionOIMApp.view.backing;
import java.util.HashMap;
import javax.faces.event.ActionEvent;
import oracle.iam.ui.platform.view.backing.BaseMB;
public class Redirect extends BaseMB {
/**
* Purpose of this method is to Redirect to Manage Role
* @param actionEvent action event
*/
public void actionListener(ActionEvent actionEvent) {
System.out.println("Entering Sample Redirect");
CustomFacesUtils.launchTaskFlow("home", "/WEB-INF/myOIMtask-flow-definition.xml#myOIMtask-flow-definition",
"home", "/images/home.png", null, "helpTopicId", false, new HashMap<String, Object>());
System.out.println("Launch taskflow successfull");
}
}
20. From inside the actionListener method using CustomFacesUtils.launchTaskFlow() method to launch our custom taskflow. This actionListener method will be configured against the actionListener listener property of the link in OIM.
21. From under WEB-INF open adfc-config.xml and switch to the Overview section. Define the Redirect class managed bean with backingBean scope.
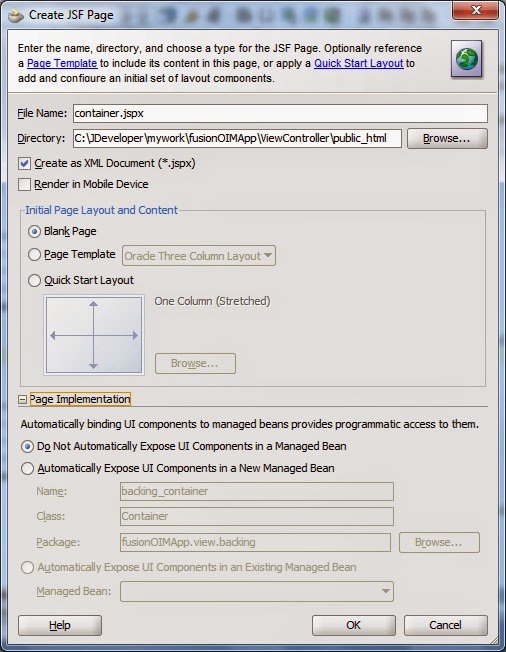
22. Right click on the viewController and create a JSF page -
23. Provide file name, select option "Create as XML Document" and leave other options as default.
24. It would create blank container.jspx page. Now drag and drop the taskflow definition xml (in our example myOIMtask-flow-definition.xml) from the projects pane of the Jdeveloper in to this jspx page as region.
25. Finally the page should look like this -
26. Right click on the container.jspx page and Goto Page Definition, a dialog box would appear and prompt you to create page definition. Click on Yes.
27. Repeat this previous step for the other jsff pages as well.
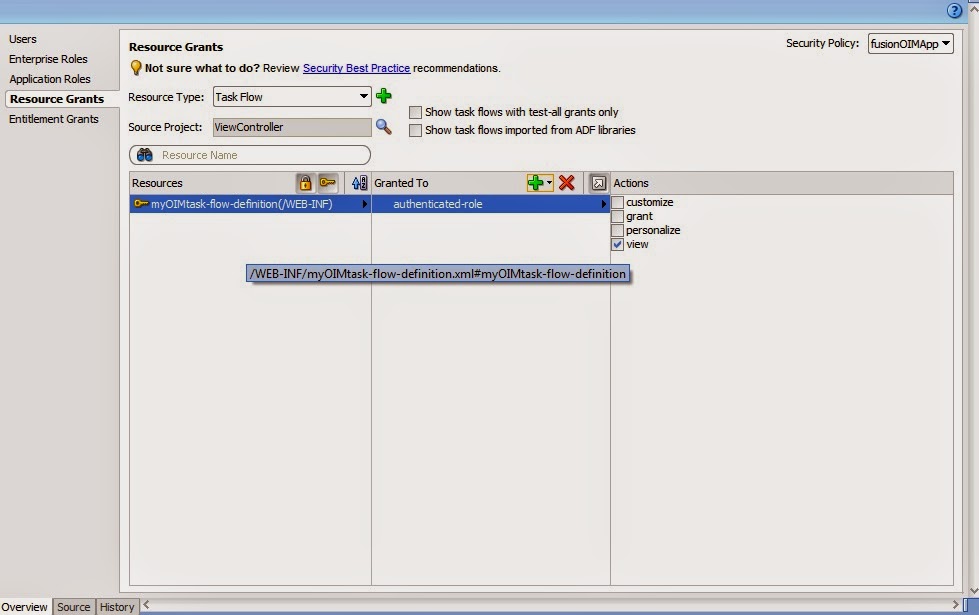
28. From Application tab of Jdeveloper, select secure -> Resource Grants. From Resource Type select taskflow. From Granted To pane click on add Application Role, select authenticated-role and click on OK. From Actions pane select view and click on save.
29. Repeat this step for the web pages as well by selecting the web page option from Resource Type.
30. Compile the project and export it as ADf Library Jar File.
31. Navigate to <Oracle Home>/<Middleware Home>/Oracle_IDM1/server/apps/ directory.
32. After backing up the war oracle.iam.ui.custom-dev-starter-pack.war unpack it and within WEB-INF create a folder named lib and place your ADF library jar here. Repack the war and place it in the same location where it has been picked up from that is <Oracle Home>/<Middleware Home>/Oracle_IDM1/server/apps/.
33. Stop OIM server. Login to weblogic admin console and then from deployments update the deployment oracle.iam.ui.custom.
34. Start OIM server.
Our custom adf project is deployed in OIM server now. Next set of steps are about how to create link in OIM and configure the actionListener to launch the taskflow that we just created and deployed.
1. Log in to OIM Identity Console. Create a sandbox and activate it. Click on the Customize link and select the view as source. Add a Command Image Link or any other component as per Requirement.
We have adde a Detail Header Custom Ops and within that created a command image link as My link.
2. Export the sandbox and unzip it. Edit page where the link was added and add actionListener property to the link. In our case since we added the link in the left navigation pane the file to be edited is <sanbox name>\oracle\iam\ui\platform\pages\mdssys\cust\site\site\lhs-nav.jsff.xml and actionListener property would appear as
actionListener="#{backingBeanScope.myActionBean.actionListener}"
3. Re-zip the sandbox contents and re-import it in OIM.
We are done with adding link in OIM. Next set of steps are to provide authenticated-role with taskflow
1. Log in to EM console. Expand Weblogic Domain, right click <oim domain> the security and the application policies.
2. Select Application Stripe as OracleIdentityManager and click on search.
3. Select authenticated-role and click on Edit. From the permission sub tab click on add.
In the permission class add "oracle.adf.controller.security.TaskFlowPermission", in the Resource Name add your taskflow in our case it is "/WEB-INF/myOIMtask-flow-definition.xml#myOIMtask-flow-definition".
In the Permission Actions provide "View".
Click on Select and then OK.
Finally we are done with all the configurations and deployment and good to go for testing our custom ADF page in OIM.
Login to OIM Identity Console activate the sandbox and click on the link that has been added. Following page should appear and upon providing input in the text field and submitting, a dialog same as in the following screenshot should appear.
Nice.. informative..
ReplyDeleteI have followed the same steps just a small change I have done is in the application role as the same functionality needs to work in Forgot Password Link.
ReplyDeleteAt the end I am getting the below error ,
javax.servlet.ServletException: Target Unreachable, 'mainBean' returned null
at javax.faces.webapp.FacesServlet.service(FacesServlet.java:277)
at weblogic.servlet.internal.StubSecurityHelper$ServletServiceAction.run(StubSecurityHelper.java:227)
at weblogic.servlet.internal.StubSecurityHelper.invokeServlet(StubSecurityHelper.java:125)
at weblogic.servlet.internal.ServletStubImpl.execute(ServletStubImpl.java:301)
at weblogic.servlet.internal.TailFilter.doFilter(TailFilter.java:27)
at weblogic.servlet.internal.FilterChainImpl.doFilter(FilterChainImpl.java:57)
at oracle.help.web.rich.OHWFilter.doFilter(Unknown Source)
at weblogic.servlet.internal.FilterChainImpl.doFilter(FilterChainImpl.java:57)
at oracle.adf.model.servlet.ADFBindingFilter.doFilter(ADFBindingFilter.java:205)
at weblogic.servlet.internal.FilterChainImpl.doFilter(FilterChainImpl.java:57)
The adfc-config.xml file content is as below ,
ReplyDeletemainBean
view.backing.Redirect
backingBean
The other codes are same as in the blog.
--Regards,
Mainak
Awsm Blog... thanks for sharing..
ReplyDeleteHi,
ReplyDeleteI have followed the procedure described above but i am not able to see the jsff page in the tab which opens on clicking the command link.. Any reason this could happen ? Any help will be greatly appreciated.
Provide oracle.adf.controller.security.TaskFlowPermission and view access to your taskflow.
DeleteHi,
ReplyDeleteHow can i launch the task flow from unauthenticated pages like signin page?
Thanks.
Hi, tanks for the post.
ReplyDeleteSame as above, how can I launch the task flow from custom forgotten password?
I have an exception: " Incorrect binding for raiseTaskFlowLaunchEvent"
The procedure works fine. But the task flow event cannot be launched from certain pages like the login page. That's because those pages have not the tag with "raiseTaskFlowLaunchEvent" id.
DeleteI'm trying to understand if it is possible to add the tag on the login page.
Hi, I need to add a validation on a Custom Catalog UDF using ADF, Can you please help me how to do it.?
ReplyDelete